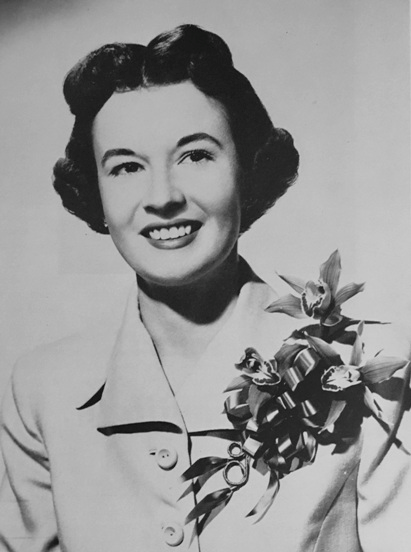
Photo from Louis Boyle's Out West, 1952
"A corsage of Cymbidium Orchids to be proud of."
Blast from the Past: We Used to Make Orchid Corsages
During our first 20 years or so, orchid corsages, and dressing well generally, were a big part of our society. We might not realize that, if it were not for the precious few newspaper clippings and newsletters that we have managed to recover from that time. When we held a big event, such as the annual luau (usually in August) or the annual awards banquet (usually in January, and after 1957 at the Petroleum Club — a SCOS member was also a member there), the ladies of South Coast Orchid Society would get to work making orchid decorations and corsages by the dozens. They were clever and enterprising. They figured out how to make stylish, tasteful corsages out of all sorts of orchids: not just the usual Cattleyas and Cymbidiums, but also various Oncidiums, Dendrobiums, and anything else that was available. In those days, too, the corsages our members preferred were all about the beauty of the individual flowers. The style of the times (1950's) emphasized clean, elegant lines, so there was no need to add foliage, frills, little dried flowers and berries, lace, or any of the other additions that we sometimes see today. Just a one flower, or a small group of flowers tasefully arranged, with only enough ribbon to hide the stems. Besides, anything more would hide the tailored lines of the dress, jacket, or coat.
Thanks to Louis M. Boyle's wonderful and now incredibly nostalgic book, Out West: Growing Cymbidium Orchids and Other Flowers, the Story of El Rancho Rinconada (1952, Los Angeles: Times-Mirror Press), we can tell you exactly how it was done.
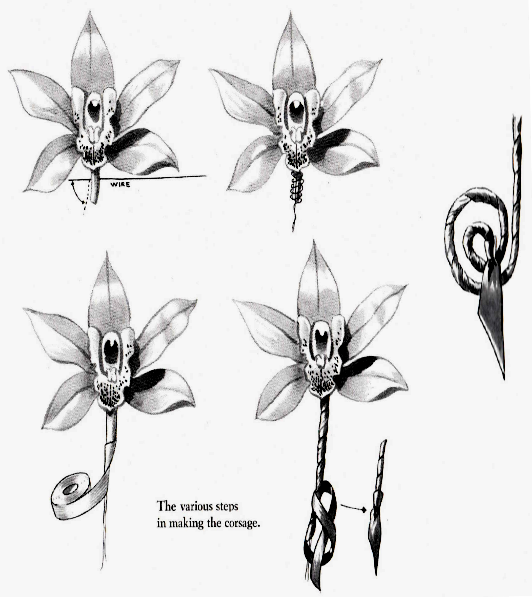
Boyle included a short section on "Making a Corsage with Cymbidium Orchids":
"You will derive a lot of pleasure out of making and wearing Cymbidium orchid corsages from flowers which you have grown on your own plants. You can make these corsages with any number of blooms you may desire from one to five or more. Most generally three blooms are used for this purpose.
"In making a corsage with Cymbidium blooms there are a few do's and don'ts which I think we should observe. In the first place, let your flowers do the talking. Keep your arrangements simple, don't try to add fern or other foliage, it's a mistake. The ribbon you use must be harmonizing with your bloom otherwise you will spoil the effect.
"Speaking of ribbon, use half-inch width, no wider, and remember in your arrangement you are wearing flowers, not ribbon. Two-tone ribbon is very attractive, that is to say, ribbon which has one color on one side and another color on the other, the two harmonizing with the bloom you are using. This type of ribbon is not generally found on the ribbon counters of department stores but is carried by florist supply houses.
"In addition to your ribbon you will require some No. 26 black annealed wire for wiring your blooms and floratape for covering the wire. You can if you wish make up your corsage with just the floratape wrapping around the stems and wire. However, if you ribbon-wrap the stems and wire you will have a far more attractive arrangement.
"Before starting to make up your corsage be sure to harden the bloom off in water for several hours. Don't attempt to cut fresh flowers off your spikes on the plants and make up a corsage for the bloom in the majority of cases won't hold up for any length of time. After you have hardened off your bloom you are ready to start with your corsage.
"First, cut off the stem of each bloom you intend to use, leaving about an inch, then wrap the remaining stem with about a two-inch piece of floratape. This will prevent the wire from cutting into the stem. Your wire should be twenty-six gauge, annealed, and about eight or more inches long—you can always cut off any little excess if you need to. Take the wire and push this through the stem, as shown in the first sketch, about two inches, then bend the short end downward and parallel with the stem. Now hold the flower in your left hand and be very careful not to injure the sepals, petals and other parts of the bloom while you make several turns around the stem with the long end of the wire as shown in the sketch. This will leave about three inches of stem and wire.
"Now completely wrap this with floratape as shown in the third sketch. The length of ribbon required to wrap the stem and wire with a knot tie will vary. For this reason, it is best to buy your ribbon in full rolls. In wrapping the stem with ribbon begin at the top and wind the ribbon downward over the florataped wire and stem in the same manner as you did with the floratape. About one inch from the bottom make a loop knot and pull this downward and tight. Be sure that the knot comes on the wire as shown in the sketch.
"After you have finished your individual blooms in this manner, combine them in your arrangement by twisting the ribbon-covered wires together.
"Make your ribbon bow as shown and tie this tight to your arrangement with a separate piece of ribbon. Finish the ends of each ribbon-wrapped wire as shown in the sketch. With a little practice you will become perfect."